


Animal Implantation
Site Preparation
The site should be prepared in a manner similar to how you would prepare a site for any other routine aseptic injection. The needle assembly is clean, inert and comes in a sterilized packaged. In horses, a complete surgical prep is necessary to prevent clostridial infection.
Implanting instructions (models ID-100C, ID-162C, ID-100B/1.4 and ID-162B/1.4)
- Scan the animal to ensure no microchip is present.

- Scan microchip. Make sure microchip ID matches barcode ID.

- Attach needle to Trovan implanter. Push needle through skin: avoid contact with plunger.

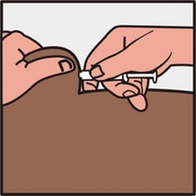
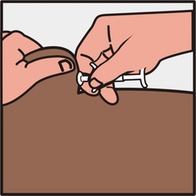
- CAUTION: do not push plunger until the needle is fully inserted.

- Press plunger to push the microchip out of the needle.


- Check the implant site to make sure the microchip has been fully inserted.
- Scan microchip inside animal to confirm successful implantation.

Implanting instructions (models ID-100VB, ID-162VB)
- Scan the animal to ensure no microchip is present.
- Scan microchip. Make sure microchip ID matches barcode ID.
- Insert needle fully, into loose skin above shoulder blades subcutaneously.
- Press plunger to push the microchip out of the needle.


- Check the implant site to make sure the microchip has been fully inserted.
- Scan microchip inside animal to confirm successful implantation.
Implant location and scanning technique
To assist in locating the microchip, certain implant sites have been standardized:
- Dogs, cats, small mammals and primates should be implanted at the base of the neck, on the dorsal midline, between the shoulder blades. Care should be taken that the transponder is implanted fully subcutaneously. Due to the nature of the RF technology, there is a slight directional component that impacts how the scanner interrogates the transponder. The following recommended technique should insure 100% data capture. Make four passes longitudinally from the mid neck to over the shoulders, two on each side of the neck. Make four passes transversely in the same area covering a dorsal arc of 90 degrees. Care should be taken to keep the scanning wand in close proximity to the animal. The trigger button should be held down throughout each pass.
- Horses should be implanted to the full depth of the needle in the nuchal ligament region, halfway down the neck and from the left side. The site should be one to two inches from the dorsal midline so the chip may be scanned from either side.
- In pets, livestock and exotics (sheeps, goats, llamas, and so forth) the tail fold on the left side is used, staying as close to the dorsal midline as practical. This allows scanning from either side.
- Avian species are implanted intramuscularly in the pectoral muscle. The owner wants the security that the chip is not easily detectable (or removable) on physical examination. To date almost all work done in avians has involved this site with no complications; however, it is pointed out that the potential exists for serious intramuscular hematoma to occur. It is recommended that the veterinarian combine the implant with some other procedure (such as sexing) until a comfortable level of proficiency is achieved. They should be prepared to deal with complications and observe the bird for a period of time after implantation. In smaller birds, the needle may only need to be inserted to the depth of the bevel to achieve intramuscular implant. Scanning should involve both pectoral regions, the base of the neck, and wings.
- Tortoises and turtles are implanted under the tallplate, on the midline, where the skin meets the shell. In larger species, the needle may be inserted to the full depth. In smaller species and babies the chip may be inserted by placing the needle only to a depth of about 3/4 of the bevel. Care should be taken that the soft shell of young animals not be injured. The chip can be scanned through the shell or by passing the wand around the posterior base of the shell.
- Snakes are implanted superficially intramuscular in the neck in the first one to two inches behind the head. Care should be taken to direct the needle parallel to the body surface.
- Pet Iguanas, monitor lizards and so forth are implanted in the thick muscle at the base of the tail. The needle should be directed between the scales.
Global Implantation Site Chart (C.B.S.G. recommendations)
All transponders should be inserted on the animal’s left side (L) where applicable.
| SPECIES | IMPLANT SITE |
| Fish Large <30 cm> |
left base dorsal fin |
Amphibians* |
lymphatic |
| Reptiles | |
| Chelonians | behind limb socket (L) |
| Crocodilians | anterior to nuchal cluster(L) |
| Lizards, Large (>12.5 cm) | inguinal region (L) |
| Lizards, Small (<12.5 cm) | intercoelomic cavity |
| Snakes | dorso-lateral (L), anterior to the vent |
Birds** |
|
|
Large (>1.5 kg and/or long legged) |
dorsally at juncture of neck and body (L) |
| Medium to Small (<1.5 kg) | pectoral muscle (L) |
| Psittaciformes | pectoral muscle (L) |
| New/Old World Vultures | base of the neck (L) |
| other Falconiformes | pectoral muscle (L) |
| Storks | pectoral muscle (L) |
| Ratites | pipping muscle |
Mammals*** |
|
| Large-Medium (>17 cm) | behind left ear, at base |
| Small-Medium (<17 cm) | between shoulder blades left or center |
| Loris | intralumbar (L) |
| Hurax | intralumbar (L) |
| Elephant | main caudal fold parallel to tail on (L) |
* Cover wound with skin bond.
** Measurements given are mass of adult bird
*** Thick skin on neck makes implantation difficult. Dermal shield makes scapular implantation difficult.
Contact customer support
inform@trovan.com